Every tool runs entirely in your browser. There's no account to create and nothing to install. Open a tool and start filling it in; your work is held in that browser as you go. The tools are free to use for completing and viewing an assessment; Pro features (save, export, print, trends, and folder organization) are unlocked by verifying your subscription email.
Saving & resuming your work
Save / Export (Pro): download your assessment as a JSON file, then re-import it later to pick up where you left off.
Folder organization (Pro, Chrome/Edge): point the suite at a local folder and save straight into it; the Files button browses and imports your saved files per tool. On other browsers, use the Import button instead.
Sessions (Dashboard): save or restore all tools at once as a single session bundle.
🔒 Your assessment data never leaves your machine. See About and Legal for how the suite handles your data and privacy.
How the Tools Fit Together
Recommended order · How each tool feeds the next
The tools mirror the federal assessment lifecycle, and they pass data to one another so you don't re-enter it. The two most common flows:
The two primary flows: SSP to SAR to POA&M feed RMF (the authorization hub), and Risk Assessment feeds the Risk Register.
Building an authorization (ATO) package
System Security Plan (SSP): describe the system and document how each control is implemented. This is the system of record for control narratives.
Security Assessment Report (SAR): assess those controls. The SAR pulls each control's narrative from the SSP (the "From SSP" panel) so the assessor works from the owner's words. Controls found Other Than Satisfied get a weakness, a risk, and a recommended corrective action.
POA&M: in the POA&M tool, Import from Tool → Security Assessment Report brings every Other Than Satisfied finding in as a tracked item, seeding the remediation plan from the SAR's recommended action.
RMF (Authorize): RMF links the SSP, SAR, and POA&M for the system and walks the authorization decision. The Dashboard's Authorization Package assembles the SSP + SAR + POA&M into one printable transmittal for the Authorizing Official.
Assessing risk
Risk Assessment: model a specific risk scenario (threats × vulnerabilities × controls) for a semi-quantitative score, per SP 800-30.
Risk Register: Link a saved Risk Assessment to carry its result into the register as a tracked, treated-over-time risk. The Risk Assessment can also import a SAR's deficiencies as vulnerabilities.
Standalone tools.CSF 2.0 (maturity across the six functions) and CMMC L2 / SP 800-171 (SPRS self-score) don't require the others, though the SSP can prefill both. Use them on their own for a maturity baseline or a CMMC readiness check. CMMC also feeds the POA&M: its Create POA&M items button sends every Partial and Not Met requirement over as tracked items, the same way the SAR does.
💡 If files don't auto-link, set up a folder and system first. Linking matches files by a stable system identity, so every tool finds the right SSP, SAR, and POA&M for the system you're working on.
Which Tools Do I Need?
Pick by what you're trying to produce
Federal agency ISSO / ISSM preparing an ATO
SSP → SAR → POA&M → RMF, plus Risk Assessment and the Risk Register for the risk narrative. The Dashboard's Authorization Package is your transmittal.
DIB contractor preparing for CMMC Level 2
Start with CMMC L2 to self-score against the 110 SP 800-171 requirements and get your SPRS number. Document implementation in the SSP and track every unmet requirement in the POA&M. Remember that L2 certification requires a C3PAO assessment; these tools cover preparation and self-scoring.
Consultant delivering a full RMF package
You'll use everything: RMF to drive the seven steps, with the SSP, SAR, POA&M, and risk tools producing the artifacts. Use Organizations & Systems to keep each client in its own folder, and Consultant branding for client-ready reports.
Quick maturity or board-level check
Just CSF 2.0. Score current and target tiers across the six functions, get a prioritized gap action plan, and track maturity over time with Trends. No other tool required.
Your Account & Devices
Sign-in · Pro & Consultant · Device management
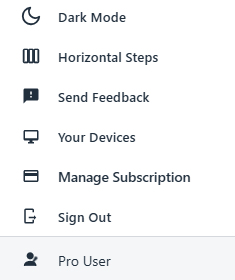
Pro and Consultant unlock by verifying your subscription email. There's still no password and nothing to install. Once verified, the browser stays signed in. Open the account menu from your name at the bottom of the left sidebar, shown on the dashboard and every tool page, to reach everything for your subscription.
The account menu, where you'll find Your Devices and Manage Subscription.
Using Pro across devices
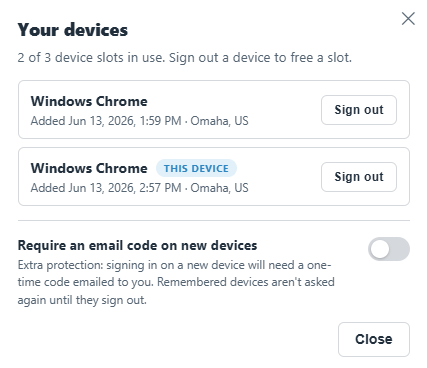
Your subscription works on up to three devices at once, for example a desktop, a laptop, and a home machine. Signing in on a fourth device automatically signs out the one you've used least recently, so you're never locked out. You can manage this yourself under Your Devices.
Your Devices: see where you're signed in, sign a device out to free a slot, and turn on email codes.
Review your devices: each entry shows the browser, when it signed in, and its approximate location.
Sign out a device: free a slot, or remotely sign out one you no longer use. Signing out clears that device's locally cached data, useful if you signed in on a shared or borrowed machine.
Optional: require an email code on new devices
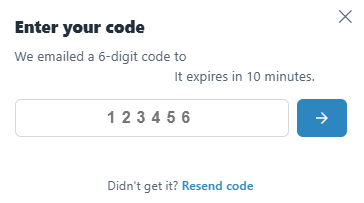
For extra protection, turn on Require an email code on new devices in Your Devices. With it on, signing in on a new device asks for a one-time 6-digit code emailed to you. Devices you've already verified aren't asked again until they sign out.
New-device sign-in when email codes are turned on.
🔒 Email codes are optional and off by default. They add a quick verification only when a new device signs in, so everyday use on devices you already trust is unaffected.
Dashboard
Suite hub · Sessions · Snapshots
Your home base: launch any tool, see at-a-glance progress across the whole suite, and save or restore your entire workspace at once, as a session bundle or a point-in-time snapshot.
How to use it
Launch a tool from the cards. They're grouped the way you'll use them: the Authorization (ATO) Package (System Security Plan, Security Assessment Report, POA&M) and the assessment & framework tools (CMMC, RMF, CSF, Risk).
Read the live metrics on each card (score, completion, or item counts) to see where every assessment stands without opening it.
(Pro) Save Session bundles all tools into one file; Import Session restores them together, ideal for backups or moving to another machine.
(Pro) Save Snapshot captures a point-in-time copy of your progress that each tool's Trends view can chart later.
Reset Session clears every tool's data from this browser. Save a session backup first if you might want it back.
Sessions vs. per-tool save
A session is the whole suite saved as one bundle from the dashboard; a per-tool Save/Export is a single assessment. Use sessions to back up or transfer everything at once, and per-tool exports when you only need to move or archive one assessment.
Authorization Package
The Authorization Package button assembles a system's SSP + SAR + POA&M into one printable transmittal for the Authorizing Official, the bundle an AO reviews to make the ATO decision. It pulls each artifact for the active system, shows a status table, and prints them in sequence behind a cover page (with your Consultant branding if set). Use it once the SSP is finalized, the SAR is complete, and the POA&M captures any open weaknesses. It's the printed companion to RMF's Authorize step.
Pro features
Save / Import Session: the entire suite in one bundle.
Snapshots: point-in-time captures that feed each tool's Trends.
Sessions folder: keep session bundles in a local folder (Chrome/Edge); other browsers use Import Session.
Tips
Save a session before a Reset, before switching computers, or at the end of a working day.
Snapshots are what make the per-tool Trends charts meaningful, so capture them at milestones.
Organizations & Systems
System Hub (Pro) · Multiple client organizations (Consultant)
The Organization button in the header (on the dashboard and every tool) opens your System Hub: one place for your organization record, its systems, key personnel, locations, and defaults. Every tool reads from it, so an active organization and system prefill and lock the org and system fields across the suite, and the active system's name flows into each tool's header and reports. Your work stays consistent without retyping the same details.
What each tier includes
(Pro) System Hub, single organization: keep one organization and its systems in one place. Choose a root folder (Chrome or Edge) and the suite saves into it; each tool locks onto the active system so names and IDs never drift between tools.
(Consultant) Multiple client organizations: keep a separate, isolated folder per client and switch between them in one click. Switching re-points every tool to that client's systems, so one client's data never bleeds into another's. You can also brand each client's reports with your firm logo and theirs. The multi-client features need a Chromium browser (Chrome or Edge).
How to use it
Open the Organization from the header button. If you haven't chosen a root folder yet (Chrome/Edge), you'll be prompted to pick one so the suite can save your files there.
Add systems under your organization. The reserved Enterprise default holds org-wide records that apply across every system.
Pick the active system: every tool then prefills and locks its organization and system fields to it. Change the active system to work on a different one.
(Consultant) Switch organizations from the switch button in the drawer header to move between clients; each keeps its own folder and its own systems.
(Consultant) Brand your reports from the Branding section of the Organization drawer: add your firm logo and each client's logo, choose firm only, client only, or co-branded, set the alignment, and they appear on every printed report's cover page and letterhead. Logos are saved with the client folder, so they travel with it.
Pro vs Consultant. The System Hub, one organization and its systems, is part of Pro. Managing multiple client organizations, with an isolated folder per client, one-click switching, and custom report branding, is the Consultant feature.
Tips
Name systems clearly; the active system's name appears in every tool's header and on its reports.
(Consultant) Keep each client in its own folder so exports and saved files stay separated by client.
The organization and system fields are read-only while a system is active, that is by design, so the same details carry across the SSP, SAR, POA&M, and the rest. Switch or clear the active system to edit them directly.
NIST RMF Assessment
NIST SP 800-37 Rev 2
Work through all seven RMF steps (Prepare, Categorize, Select, Implement, Assess, Authorize, Monitor) to assemble the core of a system authorization package.
How to use it
Move through the steps with the stepper at the top; you can jump back to any step at any time.
Prepare: capture the organizational context, key roles (AO, System Owner, ISSO), and risk tolerance before you categorize.
Categorize: derive the system impact level (FIPS-199) from its information types.
Select & Implement: choose the control baseline and capture implementation status.
Assess: record findings (these mirror what you'd document in the SAR).
Authorize: record the authorization decision (ATO, IATT, …), any POA&M items, and the Authorizing Official.
Finish to view the completion summary, then print the package; Monitor captures ongoing changes.
Save to registry. The Save to registry button records this system as a System Hub record in your org folder. Once it's registered, the other tools (SSP, SAR, POA&M) can discover the system and link to it by its stable identity, so they pull the right artifacts for it without you re-keying the name. Use it after you've named the system in Prepare to make RMF the linking backbone for the rest of the package.
NIST basis
Implements the seven steps of the Risk Management Framework, SP 800-37 Rev 2. The Assess and Authorize steps line up with the dedicated SAR and POA&M tools if you want to maintain those artifacts separately.
Pro features
Save & Export: JSON to resume later.
Print / PDF: the authorization package summary.
Files / folder organization.
Tips
Categorize first; the impact level shapes every later step.
Use the stepper to revisit earlier steps; your entries persist as you move around.
System Security Plan
NIST SP 800-18 Rev 1 · SP 800-53 Rev 5
Author a System Security Plan (system characterization, boundary, roles, and per-control implementation narratives) and print it as a formal authorization-package document.
How to use it
Work the guided steps using the stepper: system information, roles, system description, components, categorization, privacy, boundary, laws & policies, baseline, control narratives, rules of behavior, and approval.
Set the FIPS-199 categorization (Confidentiality / Integrity / Availability). The high-water mark sets the overall system level and drives the recommended control baseline.
Choose and tailor the baseline (SP 800-53B Low / Moderate / High) to match that level.
Write each control's implementation narrative: set its status (Implemented, Planned, Inherited, …), responsibility, and any organization-defined parameter (ODP) values.
(Pro) Print / PDF the formatted SSP, or save/export it to resume later.
NIST basis
The plan structure follows SP 800-18 Rev 1; control implementation narratives and baselines follow SP 800-53 Rev 5 and the SP 800-53B baselines. Marking a control Inherited reflects a common control provider (e.g. a cloud platform).
Pro features
Save & Export: JSON to resume later.
Print / PDF: a formal SSP document for the authorization package.
Files / folder organization: keep all your SSPs in one local folder.
Tips
Complete Categorize early; it drives the baseline and the controls you'll narrate.
Use the ODP fields to record actual parameter values (frequencies, roles, thresholds) rather than leaving them generic.
Mark inherited controls accurately; it keeps the narrative honest and shortens your assessment.
Security Assessment Report
NIST SP 800-53A Rev 5
Document the results of a control assessment, marking each control Satisfied or Other Than Satisfied with findings, to produce the Security Assessment Report that anchors an authorization package.
How to use it
Set the assessment scope: the controls you assessed. To avoid re-keying, use Prefill from SSP to pull the control set straight from a saved System Security Plan.
Assess each control: record the methods used (Examine, Interview, Test), the determination (Satisfied or Other Than Satisfied), and a finding / remarks. For Other Than Satisfied controls, set the weakness risk and a recommended corrective action, which prints in the report and seeds the matching POA&M item.
Watch the summary: the satisfied percentage and overall residual risk update as you go.
(Pro) Print the SAR as a formal document, export to JSON/CSV, or trend your results over time.
NIST basis
The SAR follows SP 800-53A Rev 5: each control is assessed by Examine / Interview / Test and given a determination of Satisfied or Other Than Satisfied, with a weakness, risk, and recommended action for each OTS finding. Overall residual risk is taken as the highest-severity Other Than Satisfied finding (consistent with the SP 800-30 qualitative scale), not an average, so a single high-severity gap can drive the report to High even at a high satisfied percentage. That's by design: risk is governed by the worst unmitigated weakness.
Pro features
Save & Export: JSON (resume) and CSV (per-control findings).
Print / PDF: the formal SAR document.
Trends: chart satisfied % across saved snapshots.
Prefill from SSP & Files: reuse your SSP's control set and keep SARs in one folder.
Tips
Prefill from your SSP so the SAR assesses exactly the controls you planned.
Write a finding for every Other Than Satisfied control; those become your POA&M items.
Carry OTS findings straight into the POA&M Tracker to track them to closure.
POA&M Tracker
FISMA / FedRAMP Plan of Action & Milestones
Track findings, milestones, owners, and remediation status across your plan of action, and watch open / overdue / completed counts over time.
How to use it
Add items: one per finding or weakness. These typically come from your SAR's Other Than Satisfied controls, a scan, or an audit.
Fill in each item: status (Open, In Progress, Delayed, Completed, Risk Accepted, Canceled), priority, owner, scheduled completion date, and milestones.
Track the summary: open, overdue, and completed counts. An item is overdue when its scheduled date has passed and it isn't completed.
(Pro) Export CSV for reporting, or use Trends to chart % completed, % overdue, and open items across snapshots.
NIST basis
The POA&M is the FISMA / FedRAMP artifact for tracking corrective actions to closure: the management record that pairs with your SAR findings and authorization package.
Pro features
Save & Export: JSON (resume) and CSV (for reporting).
Print / PDF: a formatted POA&M.
Trends: closure progress over time.
Files / folder organization.
Tips
Set realistic scheduled completion dates; they drive the overdue flags and the trend lines.
Prefer Risk Accepted (with a documented rationale) over leaving items Open indefinitely.
One finding per item keeps milestones and status meaningful.
NIST CSF 2.0 Assessment
NIST Cybersecurity Framework 2.0
Score your cybersecurity maturity across all six CSF 2.0 functions and 106 subcategories, set a target tier, and see a prioritized list of your largest gaps.
How to use it
Start in Overview: record the org details and set your target tier (the maturity you're aiming for).
Work through the six functions: Govern, Identify, Protect, Detect, Respond, Recover. For each subcategory, set the current and target tier, a priority, and any notes.
Watch the live summary: overall average tier and percent assessed update as you score.
Open the Summary for maturity charts, a by-function breakdown, and a prioritized gap list (where current falls short of target).
(Pro) Use Trends to chart your maturity across saved snapshots.
NIST basis
Covers all six CSF 2.0 functions and 106 subcategories. Maturity uses the four implementation tiers: Partial (1), Risk Informed (2), Repeatable (3), Adaptive (4); your gap is the distance from current tier to target.
Pro features
Save & Export: JSON (resume) and CSV (scores).
Print / PDF: a summary report with charts and gaps.
Trends: maturity over time.
Files / folder organization.
Tips
Set targets before scoring so the gap analysis is meaningful from the start.
Use the priority field to sequence remediation; the gap list is ordered by priority and size.
You don't have to score everything at once; percent-assessed shows how far along you are.
NIST AI RMF Assessment
NIST AI Risk Management Framework 1.0 (AI 100-1), plus the Generative AI Profile (AI 600-1)
Assess how well your organization manages the risks of an AI system across the four AI RMF functions, then work through the generative-AI-specific risks. Every subcategory gives you tier-by-tier examples and Playbook actions, so you always know what the right tier looks like.
The four functions
Govern (cross-cutting): the culture, policies, roles, and accountability that make the other three functions possible. Start here.
Map: establish the context and frame the risks of each AI system.
Measure: analyze, benchmark, and monitor the identified risks.
Manage: prioritize and act on risks, allocate resources, and respond, recover, and communicate.
How to use it
Set the context in Overview: name your organization and the AI system you're assessing, set a target tier, and capture your methodology, scope, and assumptions for a defensible record.
Score the 72 subcategories: move through Govern, Map, Measure, then Manage. Click any subcategory row to open its drawer, where you'll find what each tier looks like for that specific outcome, the official Playbook actions, and a crosswalk to related regulations. Set the current tier, target tier, priority, and optionally a due date and evidence basis.
Complete the GenAI Profile: if your system uses generative AI, mark which of the 12 risk categories apply and record your mitigations.
Open the Summary: function maturity scores, a radar chart, a prioritized gap action plan with due dates, and your applicable GenAI risks, all in one place.
(Pro) Push and track: send tier gaps to the POA&M and applicable AI risks to the Risk Register, export or print, and use Trends to chart improvement over time.
Understanding the tiers
The AI RMF is outcome-based and deliberately does not prescribe maturity tiers. To make per-outcome progress measurable, the tool scores each subcategory on a four-level scale using the familiar Partial (ad hoc, reactive), Risk Informed (approved practices, not yet organization-wide policy), Repeatable (formal organization-wide policy, regularly updated), and Adaptive (continuously improved and predictive) language, which comes from the NIST Cybersecurity Framework. It is not a grade to maximize everywhere: set each subcategory's target to fit its risk. The drawer shows a concrete example of all four levels for each outcome.
The Generative AI Profile
The GenAI Profile (NIST AI 600-1) names 12 risk categories unique to or amplified by generative AI, such as confabulation (hallucinations), data privacy, harmful bias, information security (prompt injection), and value-chain dependency. It supplements the Core assessment, so complete it only if your system uses or builds on generative AI. Risks you mark "Applies" or "Under Review" can be imported into the Risk Register.
Pro features
Save & Export: JSON (resume) and CSV (every score, due date, and evidence basis).
Push to POA&M / Risk Register: tier gaps become remediation items; applicable GenAI risks become register entries.
Print / PDF: a summary report with charts, the gap plan, and GenAI findings.
Trends: maturity over time across saved snapshots.
Tips
New to the AI RMF? Start with Govern, then Map, Measure, and Manage.
Open a subcategory and read the tier-by-tier examples before you rate it; they make picking the right tier straightforward.
Use the evidence basis field to distinguish a self-assessment from an independently validated one.
Try Load Sample (free) to see a fully worked example assessment.
CMMC L2
CMMC L2 · NIST SP 800-171 Rev 2 · DoD SPRS
Self-assess against all 110 NIST SP 800-171 Rev 2 security requirements and get an automatically computed DoD SPRS score, the readiness measure relied on for CMMC Level 2. It's built for defense contractors and their assessors who need a fast, honest picture of where they stand against the 14 requirement families.
Important: this tool supports preparation and self-scoring only. CMMC Level 2 certification requires a third-party assessment by an authorized C3PAO (self-assessment with an annual affirmation is allowed only for the limited set of non-prioritized acquisitions). It uses SP 800-171 Rev 2 because that is the revision CMMC 2.0 currently references; NIST published Rev 3 in 2024, but DoD has not yet adopted it for CMMC.
How to use it
Enter your system details at the top: system name, organization, and assessment date. These flow into exports and the printed report.
Work through the 14 families (Access Control, Awareness & Training, Audit & Accountability, and so on). Expand a family to see its requirements.
Set a status for each requirement: Met, Partially Met, Not Met, or N/A. Click a requirement to open its detail panel, where you can read the discussion, record implementation notes, and set a POA&M target date for any gap.
Watch the SPRS score and per-family progress update live as you go. The score bar and family completion bars reflect your current answers immediately.
Use the status chips to filter: click Not Met or Partially Met to jump straight to the requirements that still need work.
(Pro) Save, export, print, or trend it: export to JSON/CSV, generate a printable report for your file, or use Trends to watch your SPRS score climb across saved snapshots.
How the SPRS score works
The score follows DoD's NIST SP 800-171 Assessment Methodology: you start at 110 (all requirements met) and each unmet requirement subtracts its weight (1, 3, or 5 points depending on its impact on the system) for a maximum of 110 and a floor of −203. Requirements you mark N/A are excluded from the applicable total. Partially Met still deducts the full weight, since SPRS only credits fully implemented requirements. Use the notes and a POA&M target date to capture partial progress.
Pro features
Save & Export: JSON (to resume later) and CSV (for spreadsheets or your assessor).
Print / PDF: a formatted assessment report with your score, per-family breakdown, and notes.
Trends: import prior snapshots to chart your SPRS score and percent-met over time.
Files / folder organization: keep all your CMMC / 800-171 assessments in one local folder.
Tips
Only mark a requirement N/A when you can document why it doesn't apply; assessors will expect a justification.
Put a real date in the POA&M target field for every gap; it makes turning this into an actual Plan of Action & Milestones much faster.
A score of 110 means full implementation; a positive score still means open gaps remain unless every requirement is Met.
Assessment readiness checklist (self-assessment or DIBCAC)
Whether you affirm a self-assessment or face a DoD DIBCAC (Defense Industrial Base Cybersecurity Assessment Center) or C3PAO review, assessors verify evidence, not checkboxes. Before you submit a score, confirm you can produce:
A current SSP describing how each of the 110 requirements is met (build it in the SSP tool; it can prefill this assessment).
A POA&M for every Not Met and Partially Met requirement, each with an owner and a target date (push gaps straight to the POA&M tool from a finding).
Objective evidence per requirement: policies, procedures, configurations, screenshots, logs, or tickets, dated and mapped to the requirement.
A defined assessment scope: which systems, networks, and CUI data flows are in boundary, consistent with your SSP boundary.
N/A justifications documented for any requirement marked N/A.
Your SPRS score and assessment date recorded, with the methodology (this tool computes both), ready to enter in SPRS.
An affirming official identified for the annual affirmation, where self-assessment is permitted.
This checklist is preparation guidance, not a substitute for the official DoD Assessment Methodology or a C3PAO assessment.
Risk Register
Risk Management · Tracking & Response
A persistent, organization or system level register of risks tracked over time. Where the Risk Assessment captures a point-in-time analysis, the register is the living record you maintain: each risk carries an owner, a chosen response, controls, a residual rating, and a next-review date.
How to use it
Add a risk: write a clear risk statement, pick a threat-source category, and rate inherent likelihood and impact.
Choose a response: select a NIST risk response and record the controls or plan that reduce the risk.
Rate residual risk: re-rate likelihood and impact after treatment to show the risk you are left with.
Own it and review it: assign an owner, set a status and next-review date, then sort and filter the register to manage it.
(Pro) Save, export, or print the register, and re-import a saved JSON to resume.
NIST basis
The risk register and its lifecycle follow SP 800-37 Rev 2 and SP 800-39. Inherent and residual ratings use the SP 800-30 Rev 1 likelihood and impact scales (Appendix G and H). Risk responses (mitigate, accept, avoid, transfer, share) are from SP 800-39; threat-source categories (adversarial, accidental, structural, environmental) are from SP 800-30 Appendix D.
Pro features
Save / import the register as JSON, and export to CSV for stakeholders.
Print / PDF a clean register report.
Sort, filter, and configure columns to focus on what matters (for example, high residual risks that are still open).
Tips
Keep inherent risk fixed as your "before controls" baseline, and let residual risk reflect the controls you actually have in place.
Use the next-review date to drive ongoing monitoring; sort by it to see what is due.
Risk Assessment
NIST SP 800-30 Rev 1
Run a system-level risk assessment the SP 800-30 way (threat sources, vulnerabilities, and controls) and get a semi-quantitative risk score that responds as you refine the inputs. You can also import control deficiencies from your other assessments as vulnerabilities, and map each control to the weaknesses it addresses.
How to use it
Scope: name the system, organization, assessor, date, and what's in scope.
Asset & Information: set the information type, system categorization, and the C/I/A impact. A brand-new assessment starts at the floor and climbs as you add risk.
Threats & Vulnerabilities: add threat sources; add vulnerabilities with a severity and exposure (type your own, pick a suggestion chip, or browse the CWE weakness database by id or name). You can also use Import findings to pull deficiencies (as vulnerabilities, since per SP 800-30 a control deficiency is a vulnerability) and satisfied controls (as existing controls) from a SAR, RMF, CMMC, SSP, or CSF assessment; a confirmation step lets you choose which categories to bring in.
Controls: add existing controls with an implementation level and effectiveness, then map each control to the vulnerabilities it covers so its effect lands on those weaknesses specifically.
Watch the live panel: initiation, susceptibility, likelihood, impact, and the overall risk score update with every change; open the Summary for the full write-up and the likelihood × impact heat map.
(Pro) Trends charts the risk score across saved snapshots.
How the score works
Follows SP 800-30 Rev 1. Likelihood is assessed in two parts and combined via Table G-5: the likelihood of threat-event initiation (the threat side, from your threat sources) and the likelihood an event results in adverse impact (susceptibility: vulnerability and exposure, reduced by controls). Controls lower susceptibility, not initiation. That overall likelihood is combined with impact into a single Appendix I semi-quantitative 0–100 score, and the qualitative level (Very Low … Very High) is read from that score's Table I-3 band, so the number and its level always agree and both move on every input. The continuous combination is calibrated to the Table G-5 and Table I-2 lookups, so it lands on the level those tables would give. The score is floored at 1 (residual risk is never zero).
Pro features
Save & Export: JSON (resume) and CSV.
Print / PDF: the assessment report and heat map.
Trends: risk score over time.
Files / folder organization.
Tips
Map a control to the vulnerabilities it covers to see exactly what it buys: a mapped control reduces just those weaknesses, while an unmapped one reduces susceptibility broadly. "Control Reduction" reports the realized drop.
Adding strong, effective controls visibly lowers susceptibility (and overall likelihood); use it to model "what if we remediate?".
You can manually override the overall control and vulnerability roll-ups; they highlight when overridden and revert automatically if you edit the underlying items.
The Summary heat map defaults to a continuous semi-quantitative surface with the inherent → residual point plotted on it; toggle it to the classic SP 800-30 Table I-3 5×5 matrix to cross-check the qualitative level.
Glossary
Acronyms used in this guide
ATO
Authorization to Operate: the Authorizing Official's formal decision to accept a system's risk and run it.
IATT
Interim Authorization to Test: a time-limited authorization to test specific system capabilities in a defined environment, not to operate the system.
SPRS
Supplier Performance Risk System: the DoD system where contractors record their NIST SP 800-171 self-assessment score.
OTS
Other Than Satisfied: an assessment determination that a control is not fully met, producing a weakness and a corrective action.
ConMon
Continuous Monitoring: the ongoing tracking of controls, risks, and changes after authorization (the RMF Monitor step).
C3PAO
Certified Third-Party Assessment Organization: the body authorized to perform a CMMC Level 2 certification assessment.
DIB
Defense Industrial Base: the contractors and suppliers that handle DoD information and are subject to CMMC.
POA&M
Plan of Action and Milestones: the managed record that tracks each weakness to closure with an owner and a target date.
SSP
System Security Plan: the system of record describing the system and how each control is implemented.
SAR
Security Assessment Report: the results of a control assessment, marking each control Satisfied or Other Than Satisfied.
RMF
Risk Management Framework: NIST SP 800-37's seven-step process for authorizing and monitoring a system.
CSF
Cybersecurity Framework: NIST's outcome-based framework for assessing and improving security maturity (version 2.0).
FIPS
Federal Information Processing Standards: here, FIPS 199, which sets a system's Low, Moderate, or High impact level.
PIA / PTA
Privacy Impact Assessment / Privacy Threshold Analysis: privacy reviews that decide whether and how a system handles personal data.
CUI
Controlled Unclassified Information: sensitive federal information that must be safeguarded, the focus of SP 800-171 and CMMC.
eMASS
Enterprise Mission Assurance Support Service: the DoD system of record for managing RMF authorization packages.
AO
Authorizing Official: the senior official accountable for the risk decision who grants or denies the ATO.
ISSO / ISSM
Information System Security Officer / Manager: the roles responsible for a system's day-to-day and program-level security.
FAQ & Troubleshooting
Common questions
Why aren't my linked files (SSP / SAR / POA&M) appearing?
Linking finds files by a stable system identity, so they only link when (1) you're using folder organization in Chrome or Edge, and (2) the files share the same system name. If a linked record shows as saved but "couldn't be read here," click Open ↗ once to grant the folder read, then return. On other browsers, use each tool's Import button to load files manually.
What does "Refresh Links" do?
It re-scans your folder for the current system's latest SSP, SAR, and POA&M and re-points the links at the newest version of each. Use it after you finalize a new version or save a file from another tab so the links and pulled-in summaries are current.
I updated my SAR after creating POA&M items, how do I reconcile them?
Re-import from the updated SAR rather than editing items by hand. In the POA&M tool choose Import from Tool → Security Assessment Report again; the importer de-dupes by source finding, so it brings in any new Other Than Satisfied findings and skips the ones you already have, without creating duplicates. Then review items whose finding flipped from Other Than Satisfied to Satisfied in the new SAR: those weaknesses are now remediated, so mark each one Completed (or close it) to keep the plan in step with the assessment. If you use folder organization, click Refresh Links first so the import reads your newest SAR.
Why is my SPRS score different from what I entered?
SPRS isn't a percentage. It starts at 110 and subtracts each requirement's weight (1, 3, or 5) for every Not Met requirement (and most Partially Met ones), with a floor of −203, per DoD's NIST SP 800-171 Assessment Methodology. Two requirements, MFA (3.5.3) and FIPS encryption (3.13.11), take a reduced deduction when Partially Met; every other requirement deducts its full weight, so a few high-weight gaps move the score a lot.
Why does the RMF Categorize step show dashes for C/I/A?
When categorization is maintained in a linked SSP, RMF reads the values from that file. Dashes mean the linked SSP couldn't be read in that view (folder read not yet granted) or its per-objective C/I/A weren't set. Click Open SSP ↗ to load it, or set the C/I/A in the SSP's Security Categorization step.
What's the difference between a Session and a per-tool save?
A session (from the Dashboard) bundles every tool into one file for backup or moving machines. A per-tool Save/Export is a single assessment. They're independent: saving a session doesn't change your per-tool files, and vice versa.
Where is my data stored?
Entirely in your browser as you work, and in your local folder or downloaded files when you save (Pro). Nothing is uploaded. Clearing your browser data or using Reset Session removes the in-browser copy, so keep a saved file or session if you'll want it back.
Ready to start?
Every tool is free to open and complete, no account required. Pro adds save, export, print, and trends for $179/year.
 Risk Posture Tools